Containerization has become a fundamental technology in modern software deployment and infrastructure management. However, while application-level containers have gained widespread adoption, a new concept is emerging at the system level: bootable containers. By packaging not just applications but entire system images into containers, bootable containers aim to solve challenges related to system consistency, immutability, and updates.
Let’s take a look at how to create and manage a bootable container from Podman Desktop (Figure 1) using the bootc extension to build workloads that you can deploy on various platforms, from bare metal to cloud environments.

What are bootable containers?
Bootable containers, also provided as image mode for Red Hat Enterprise Linux, represent an innovation in merging containerization technology with full operating system deployment. At their core, bootable containers are OCI (Open Container Initiative) container images that contain a complete Linux system, including the kernel and hardware support. This approach has several characteristics, namely:
- Immutability: The entire system is treated as an immutable unit, reducing configuration drift and enhancing security (other than
/etcand/var, all directories are mounted read-only once deployed on a physical or virtual machine). - Atomic updates: System updates can be performed as atomic operations, simplifying rollbacks and ensuring system consistency.
- Standardized tooling: Leverages existing OCI container tools and workflows, reducing the learning curve for teams familiar with containerization, and the ability to design a complete OS environment using a Containerfile as a blueprint.
This is a wonderful benefit for a variety of use cases, including edge computing and IoT devices (where consistent, easily updatable system images are crucial), as well as on general cloud-native infrastructure to enable infrastructure-as-code practices at the OS level.
While we’ll be using the Podman Desktop interface in this article, it uses the bootc-image-builder container and the bootc project to build the bootable container disk images. In addition, once a machine is created from the disk image, it can apply transactional updates in place from newly pushed container image (without creating a new disk image)! This workflow is illustrated in Figure 2.

Podman Desktop for bootable containers
We’ll be using Podman Desktop, the open source project for developers working with containers and Kubernetes, in order to create and manage our bootable container. Podman Desktop provides a user-friendly interface for container operations, making it an excellent choice for those new to (bootable) containers or those who prefer a graphical interface over command-line tools. We’ll use it to go from a bootc-compatible derived container build to these options for disk image format:
- qcow2: QEMU Disk Images, ideal for KVM and QEMU-based virtualization environments.
- ami: Amazon Machine Images, ready for deployment on Amazon Web Services (AWS) EC2 instances.
- raw: RAW disk image with an MBR or GPT partition table, suitable for direct writing to physical drives or for use in various virtualization platforms.
- iso: ISO image for unattended installation methods, perfect for creating bootable USB sticks or for install-on-boot scenarios.
- vmdk: VMware Virtual Machine Disk, usable in vSphere and other VMware products.
Set up Podman Desktop
Before we begin, ensure you have Podman Desktop installed on your system. You can download it from the official Podman Desktop website for your macOS, Windows, or Linux system (Figure 3). Once installed, launch the application to set up and configure Podman (if needed).

Now, navigate to the Extensions tab in the left sidebar, and select the Catalog to find and install the Bootable Containers extension, as shown in Figure 4.

From the left sidebar, you can now use the Bootable Containers extension, which provides a starting point for your bootable operating system work within Podman Desktop. Here in the dashboard (Figure 5), you have the opportunity to try out an example web server bootable container from this example container image, or go directly to building a full bootable operating system that you might have already built previously (or try out examples to see this in action).

Working with bootable container images
Now, we’re using OCI practices to create an OS from a container image, and we need to take into consideration what applications we need pre-installed, what services to include, and what should start automatically when the system boots. This allows you to create a purpose-built environment that's ready to use from the moment it starts up.
In this example, we’ll create and build a custom operating system image based on CentOS Stream 9 running a simple Apache HTTP server, but imagine AI workloads or full stack applications built from a single Containerfile.
Understanding the bootable container’s Containerfile
Let’s start by preparing the base image, as while application container base images are trimmed to exclude the OS kernel & hardware support, bootable container base images contain the full kernel and hardware support but in a minimal image file size. There are several flavors of continuously updated base images, but for our AI workload, we'll use the CentOS bootc image, quay.io/centos-bootc/centos-bootc:stream9.
We’re using the example Apache httpd bootable container that you can find within the Bootable Container extension in Podman Desktop, but let’s view the Containerfile that will be used to build the bootc image:
# Run a stock apache webserver
FROM quay.io/centos-bootc/centos-bootc-dev:stream9
# The default package drops content in /var/www, and on bootc systems
# we have /var as a machine-local mount by default.  Because this content
# should be read-only (at runtime) and versioned with the container image,
# we move it to /usr/share/www instead.
RUN dnf -y install httpd && \
    systemctl enable httpd && \
    mv /var/www /usr/share/www && \
    sed -ie 's,/var/www,/usr/share/www,' /etc/httpd/conf/httpd.conf
# Further, we also disable the default index.html which includes the operating
# system information (bad idea from a fingerprinting perspective), and crucially
# we inject our own content as part of the container image build.
# This is a key point: In this model, the webserver content is lifecycled exactly
# with the container image build, and you can change it "day 2" by updating
# the image.  The content is underneath the /usr readonly bind mount - it
# should not be mutated per machine.
RUN rm /usr/share/httpd/noindex -rf
COPY index.html /usr/share/www/html
EXPOSE 80
As detailed in the comments, we’re starting from a CentOS Stream 9 base image, containing the full operating system’s kernel, systemd, filesystem tools, and more, but there are also minimal images as a reference to the starting point teams can begin from. After installing required dependencies, configuring the web server as a service, and copying in artifacts, this Containerfile is ready to be built like any other traditional container image!
Pulling and building the bootable container
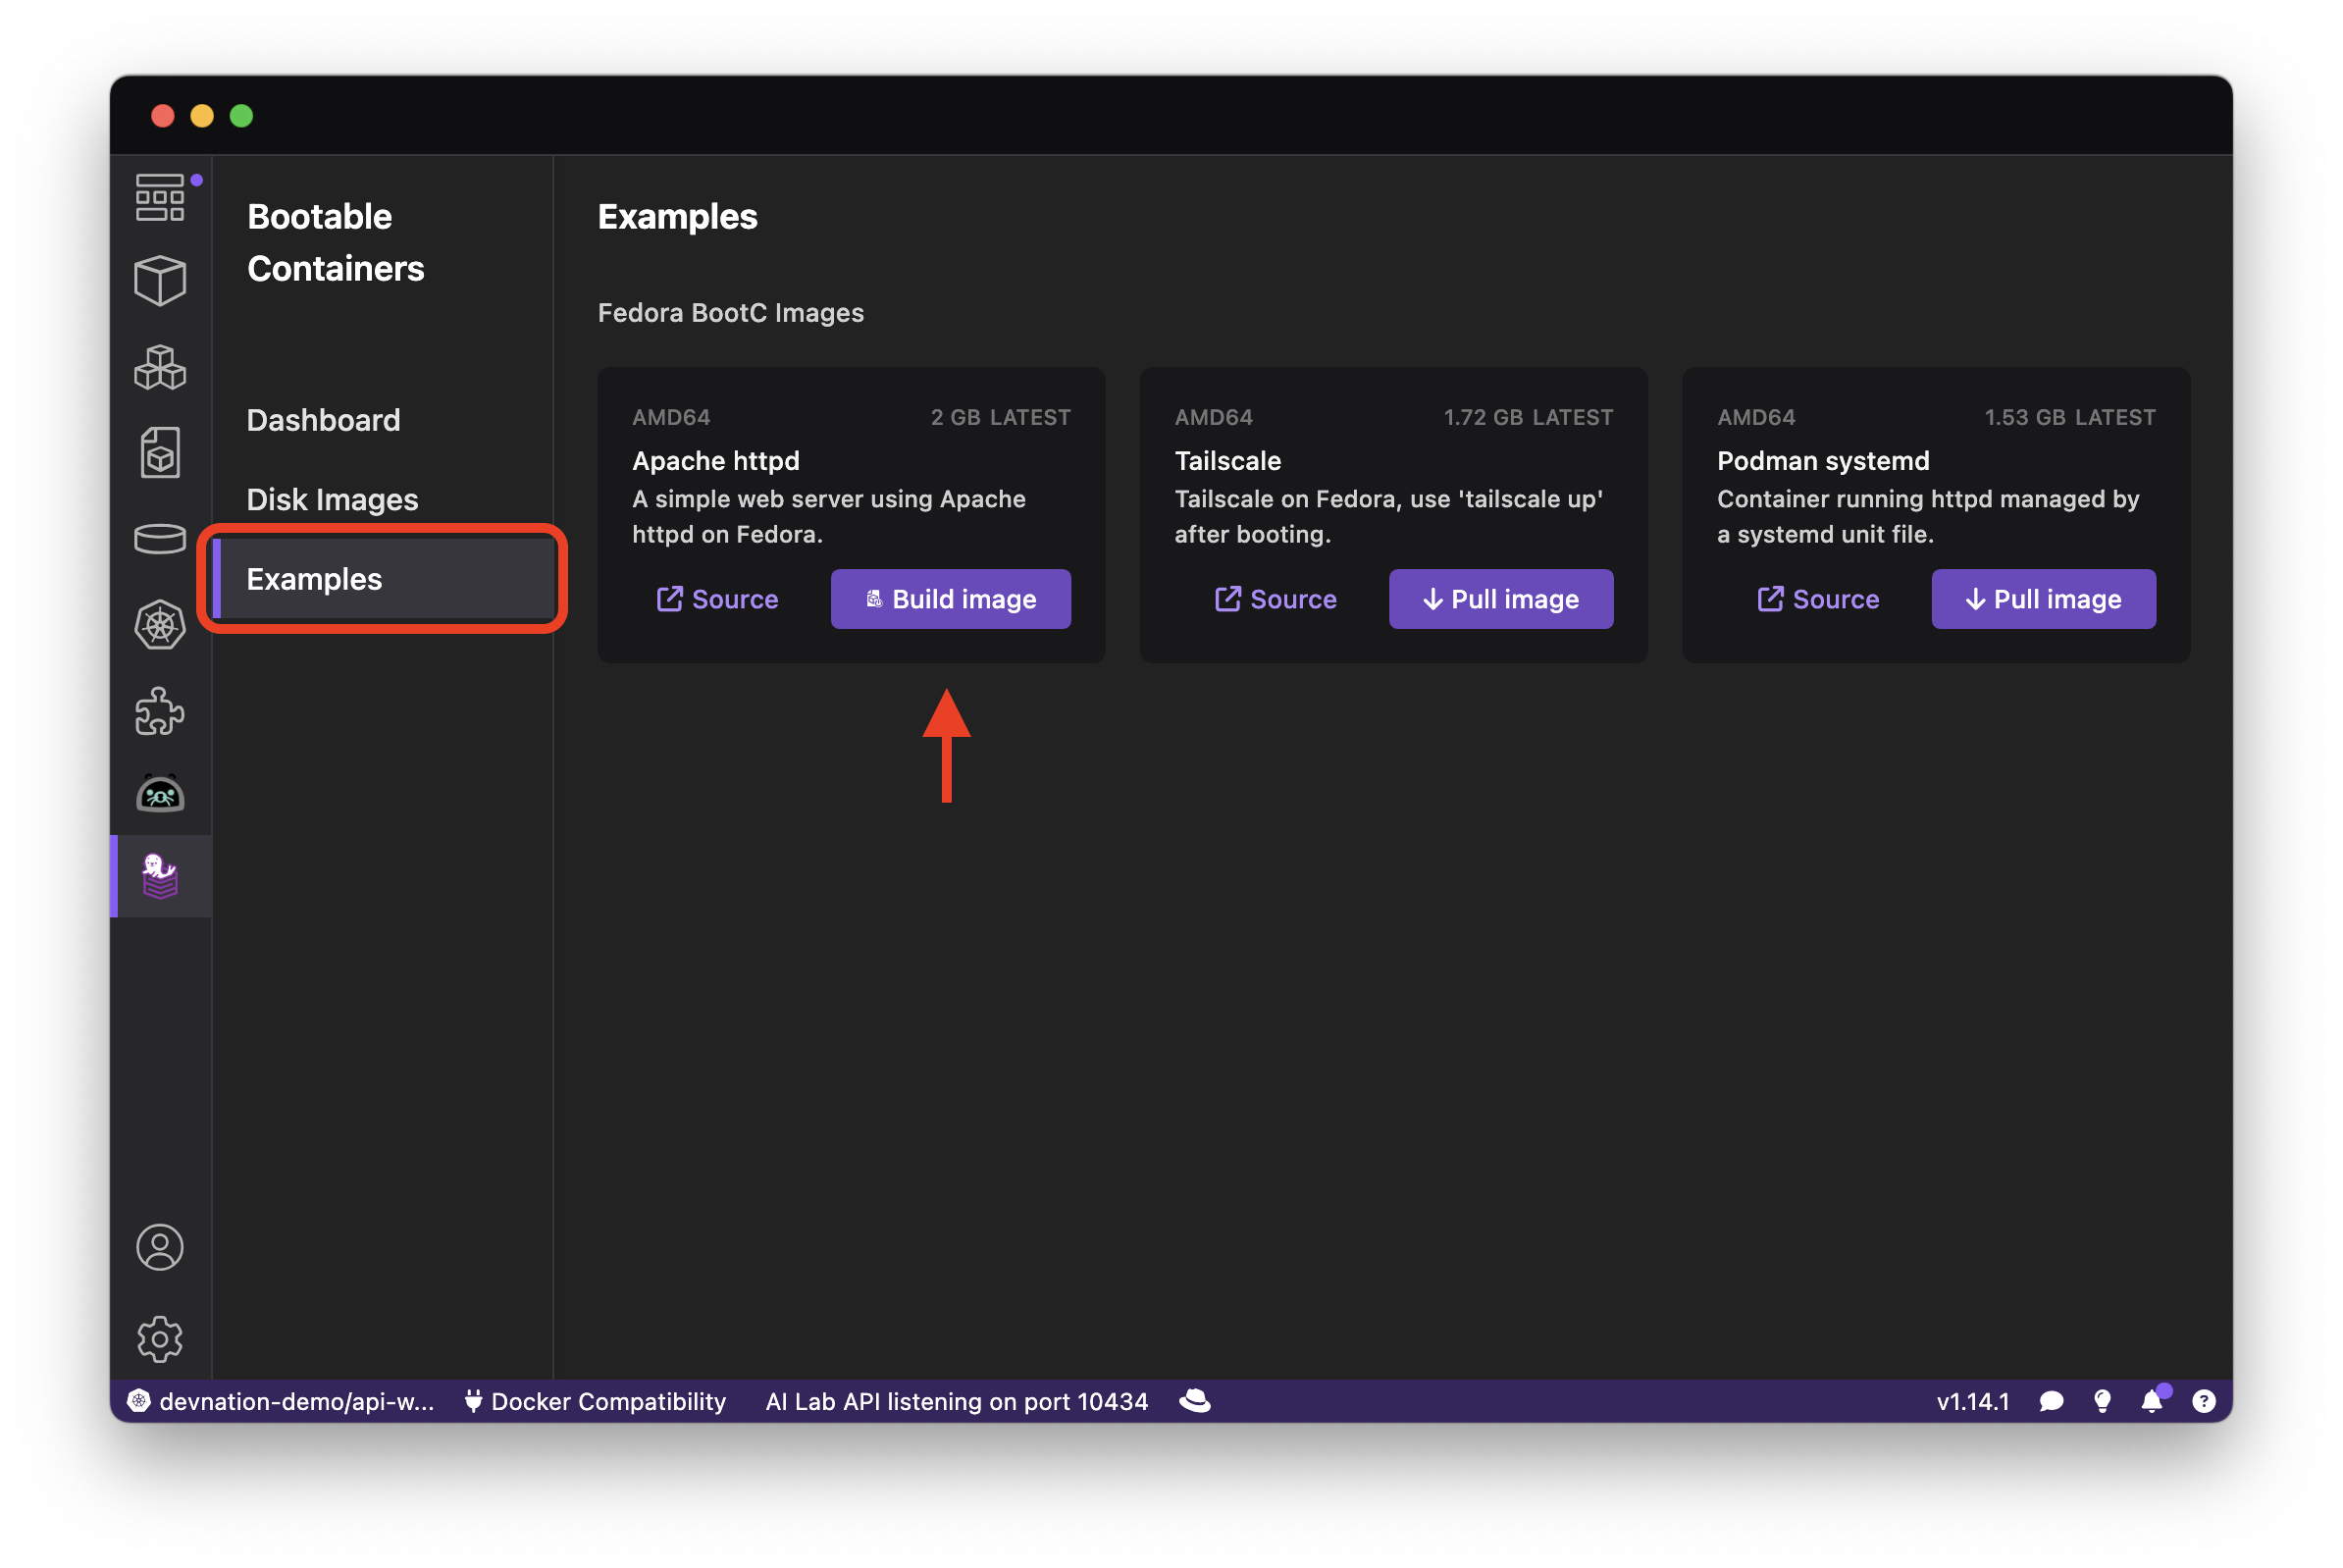
While you could use Podman or Podman Desktop to build this image and then create the full operating system with the bootable containers extension, let’s actually just go ahead and pull it down from a container registry. Select Examples from the Podman Desktop extension interface to view a few use cases (Figure 6), and select Pull Image to download it locally.

Now, you might want to run this image with Podman or Podman Desktop. But while bootable containers are OCI containers, because of their differences in the filesystem being mounted as read-only, you will perhaps encounter differences in the behavior of your expected output. Instead, podman-bootc provides a much more bootc-native experience, being able to run a bootc image in a virtual machine and have shell access. However, because these are container images, you can still tag, push, inspect, and perform many of the other standard container workflow best practices while working with bootable containers.
Due to the nature of this application being a container, we could also push our image to a registry. This is important to the lifecycle of updating these systems, as once a bootable container is installed as a disk image, future updates will apply directly from the container registry as they are published. Thus, the installation process only happens once!
Figure 7 shows the various actions for pulling the image.

Creating a bootable disk image
With your bootc-enabled image, let’s now use the bootable containers extension to create a bootable disk image by selecting Build image while still in the Examples section of the extension (Figure 8).
This will navigate you to the Disk Images menu, where the real fun begins. Here, we have the ability to select images from our registry that are able to be converted into a disk image, as well as selecting your type of disk image (raw, iso, ami, etc.), output folder for the artifact and any associated files, filesystem, and platform architecture.
As an example, we’ll select a Virtualization Guest Image (qcow2) and select Build to kick off the process (which might take a few minutes while the bootc-image-builder container is running). This involves converting the container image into a bootable format, setting up partitions, and configuring the bootloader.

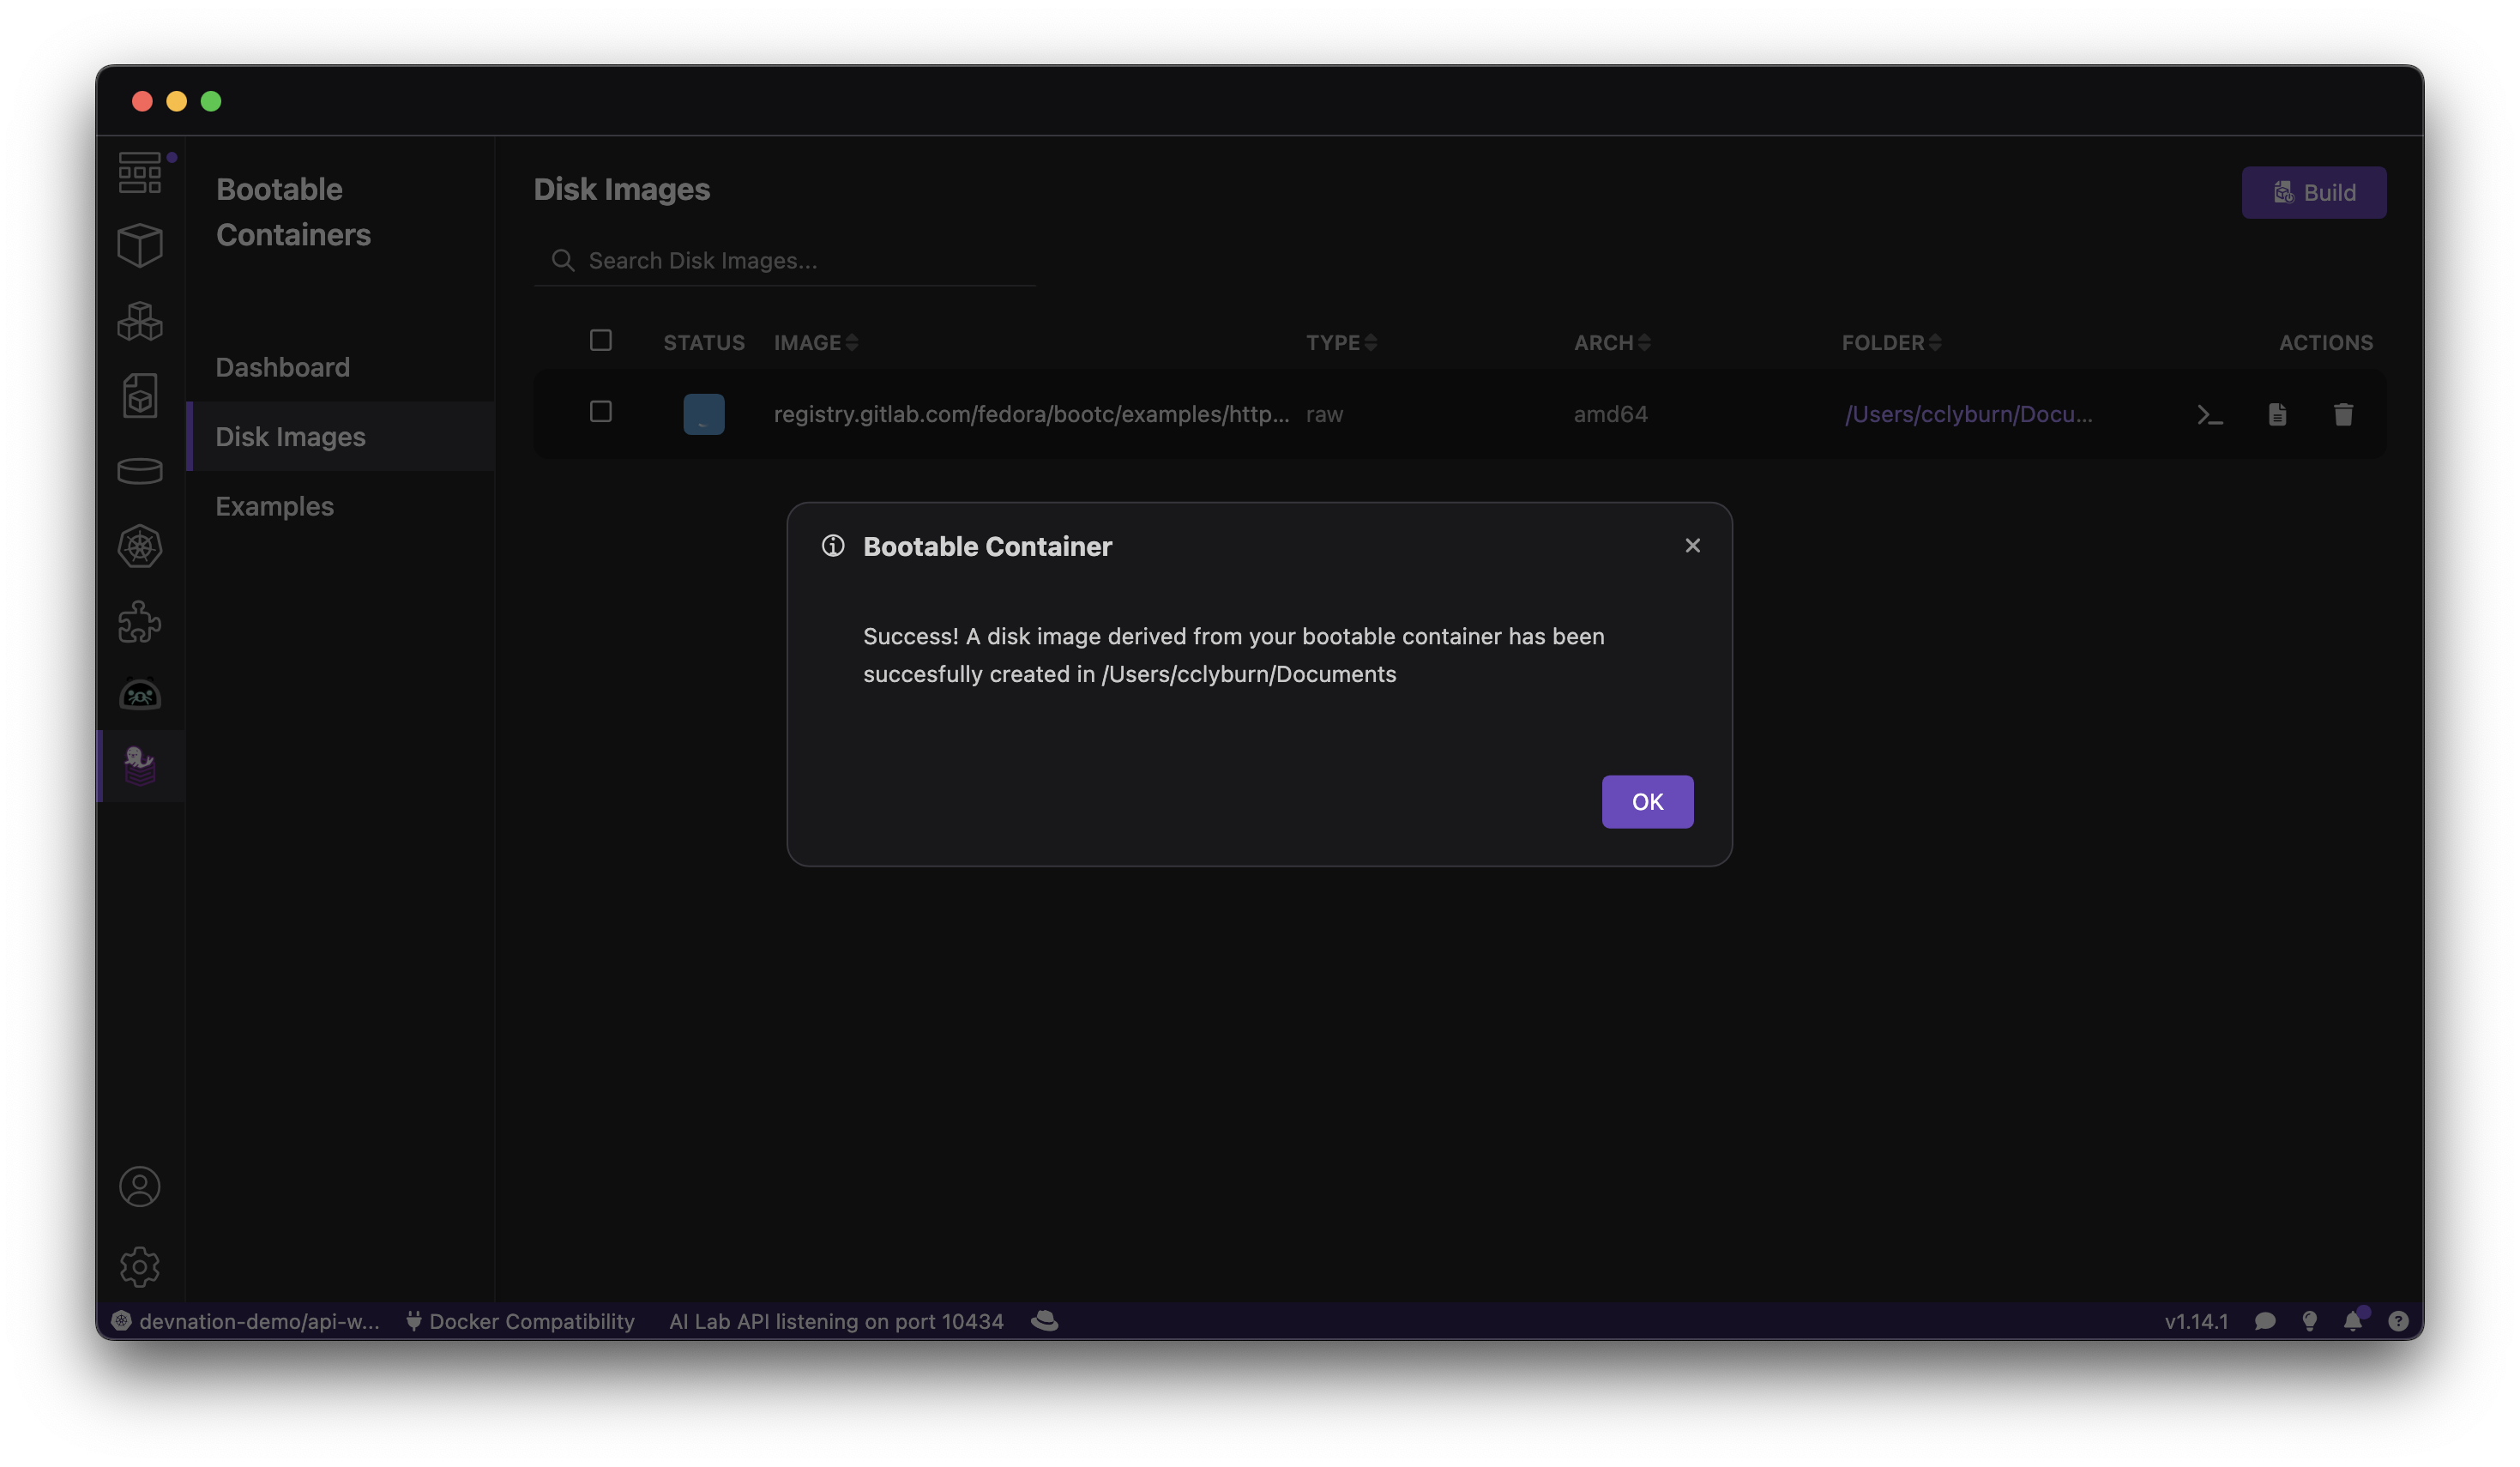
You’ll receive a build log on the resulting page, as well as the ability to spin up a virtual machine using QEMU for RAW image types. However, let’s head back to the Disk Images menu to check the status of the build, as well as other useful information about the resulting disk image operating system. After a few minutes, Podman Desktop will notify us that the build is complete. See Figure 10.
Testing the bootable operating system image
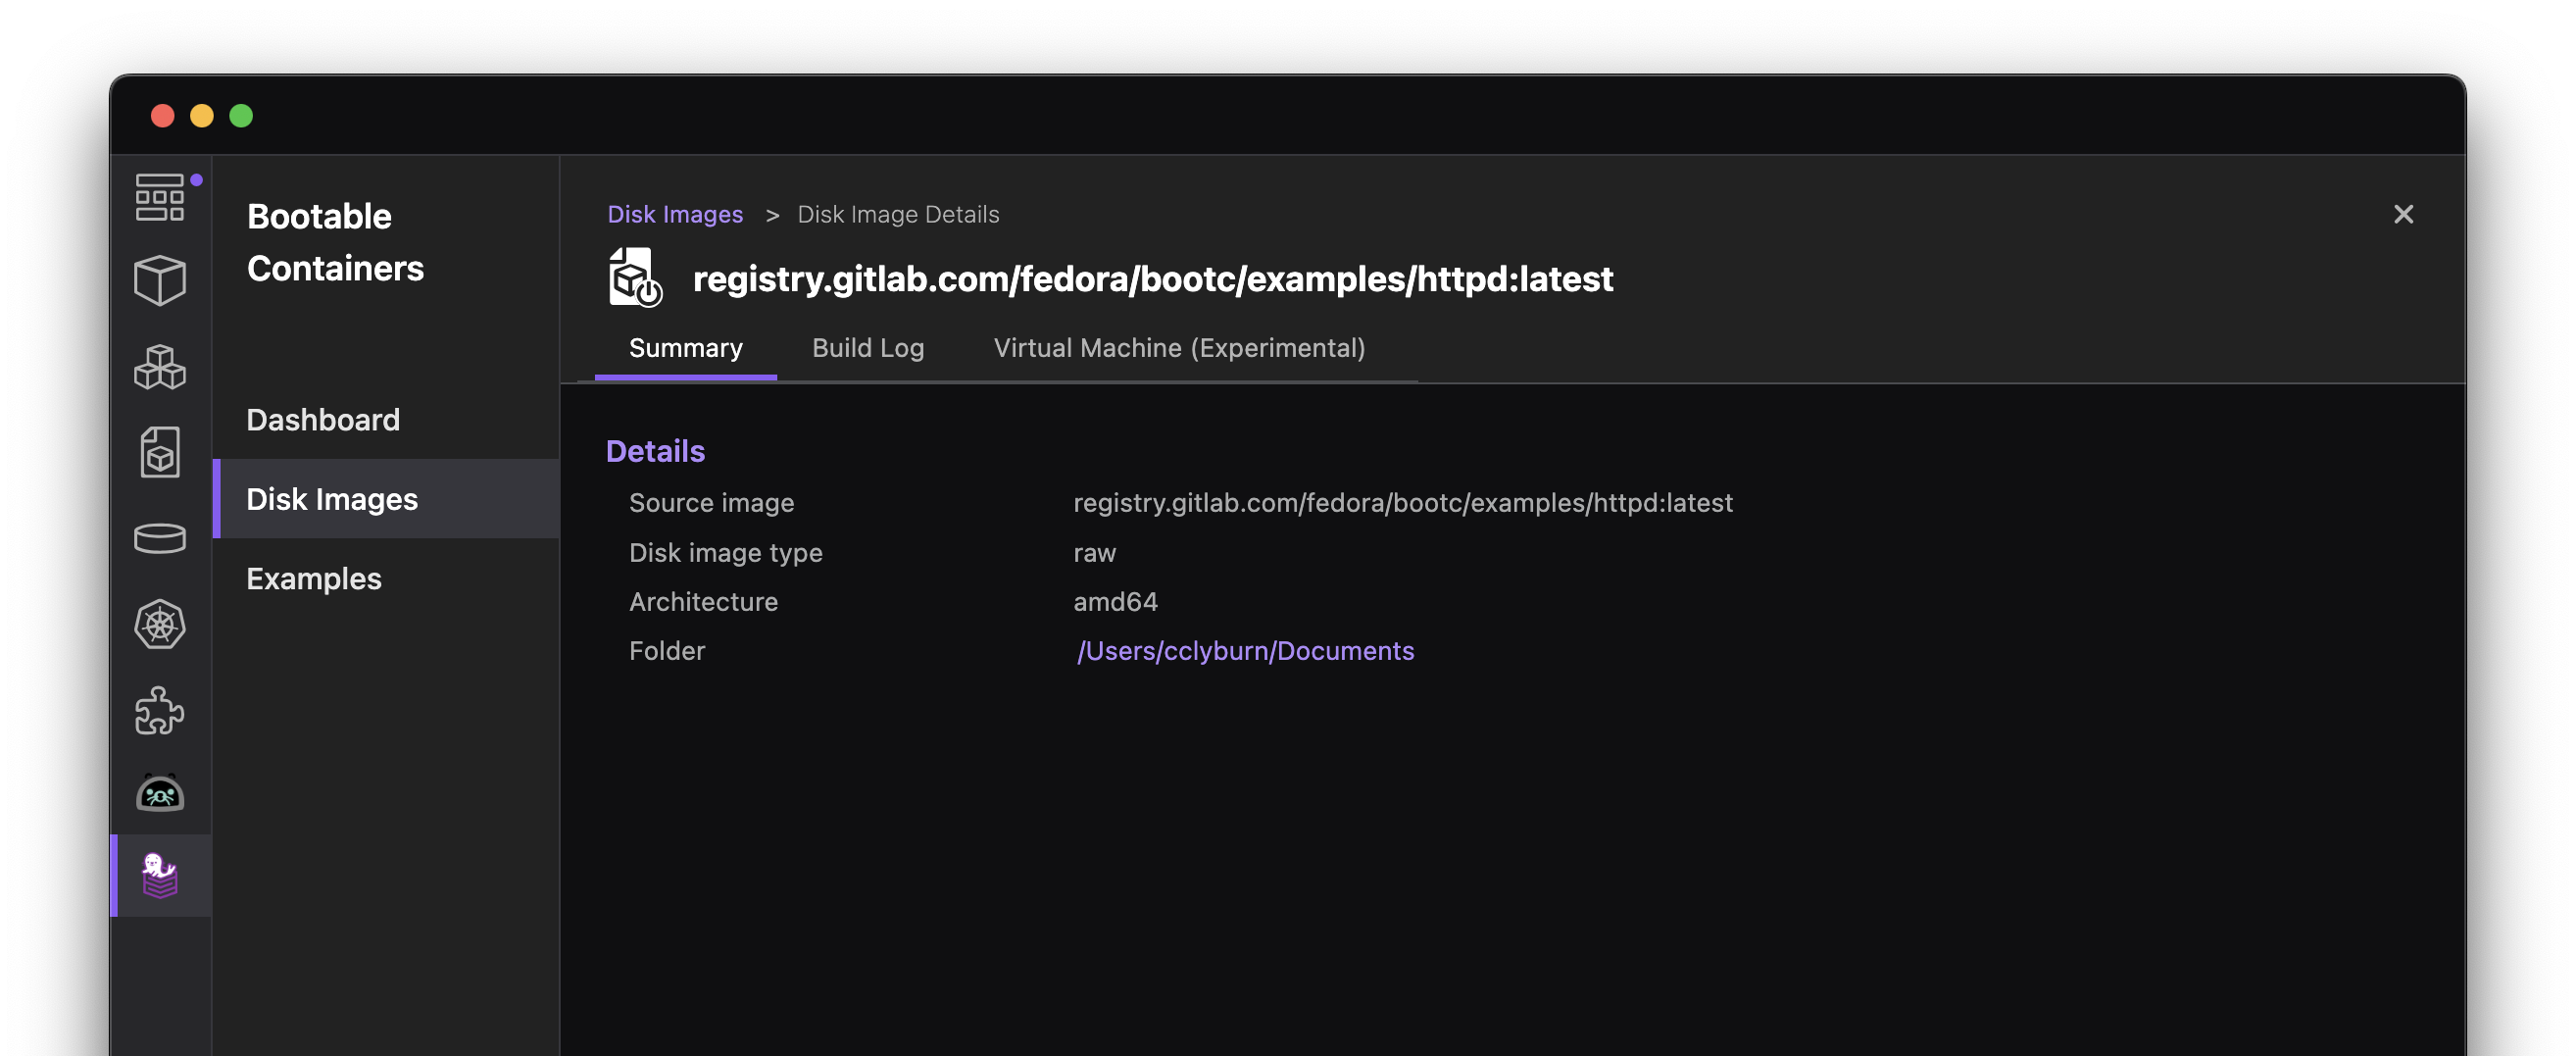
While we won’t go into detail here about running and testing these images, I’d like to point to a handy guide from the extension’s repository on GitHub about setting up a virtual machine to launch and test your image. In addition, if you’d like to try out the Virtual Machine capabilities for your newly created disk image, feel free to select the image from the Disk Images menu and explore. See Figure 11.
Now, this is where the standardized container workflow could help us by allowing us to use the previously created bootable container base image and layer extra utilities on top depending on our deployment situation. What’s also so important about bootable containers is that the installation is a one-time task. Thus, traditional day 2 changes can be done by pushing to the registry, as automatic updates are on by default (but they can be configured for maintenance windows or disabled completely). To try this out, the process can be repeated: building a new image and pushing it to the registry. The systemctl status bootc-fetch-apply-updates.timer executes after an hour of uptime, but you can use event-based updates or use bootc upgrade to fetch the update manually.
Wrapping up
With bootable containers, you can use the same tools, skills, and patterns for creating containerized applications to deliver an operating system that is easier to build, ship, and run. We can streamline infrastructure management and deployment processes by treating the entire operating system as a versioned, immutable image.
We’ve taken a look at Podman Desktop, with its bootable containers extension, to learn how to get started with bootable containers, but the journey doesn’t stop here. Check out the full documentation and learn about the supported offering of bootable containers with image mode for Red Hat Enterprise Linux.
