Foreword
Cryostat 4.0 has been released, and it’s an especially noteworthy one: this marks Cryostat’s graduation from Tech Preview to Generally Available as a supported product. With this comes some under-the-hood architectural enhancements for performance and security, as well as some significant new features.
Introduction
In this article we will examine one of the two most visible new features of Cryostat 4.0: Agent Autoconfiguration.
The Cryostat Agent has existed since the Cryostat 2.3.0 release, but it has always required complicated manual configuration of your workload application: to get the Agent JAR into the container, to get the application JVM to load the Agent, to set up a ServiceAccount and Bearer authorization token for the Agent to use, to pass configuration parameters to the Agent so that it communicates with your chosen Cryostat instance, and to set up TLS certificates for HTTPS.
With Cryostat Operator 4.0’s Agent Autoconfiguration feature all of this setup is streamlined and (mostly) automated, making it faster than ever before to get started with a fully secured Cryostat Agent setup.
Getting Started
In your OpenShift instance, open your Console, log in as an admin user, and go to the Administrator Perspective. From there, expand the Operators tab in the navigation panel, then go to OperatorHub. Search for Cryostat and install the Red Hat Build of Cryostat Operator 4.0. It may take some time for this operation to complete.
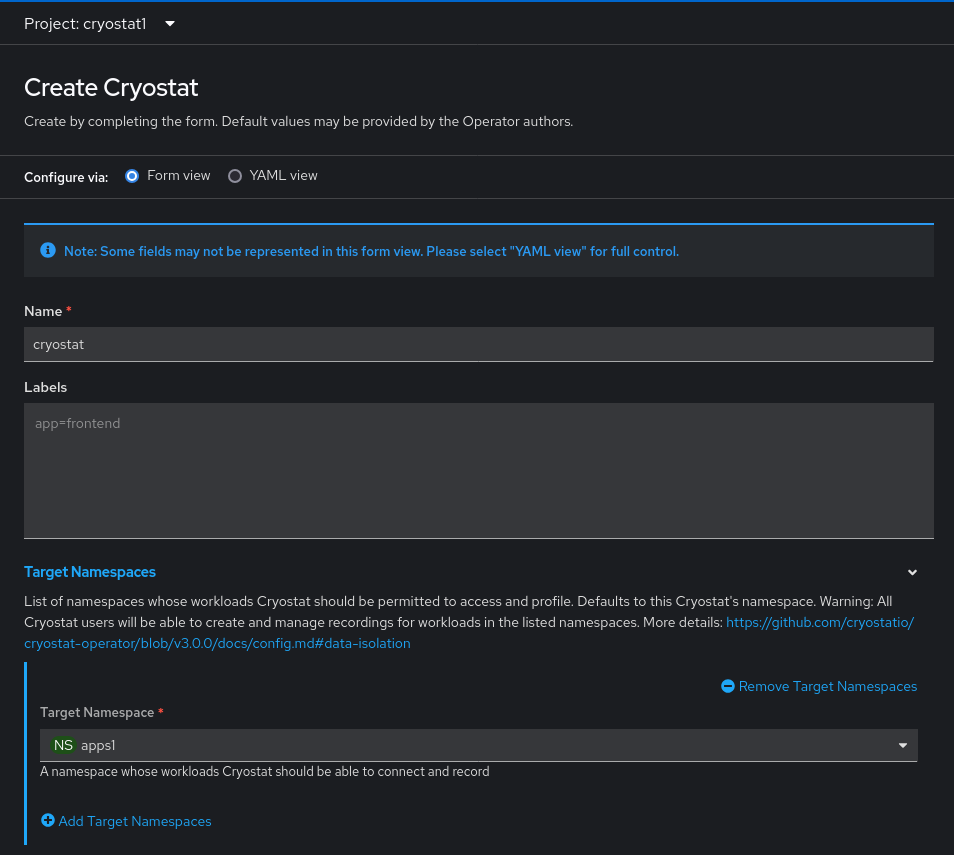
Once installation completes, from the Operators tab under Installed Operators, click the Cryostat “Provided API” item under the Cryostat Operator. This will bring you to a form for creating a Cryostat Custom Resource instance. Without diving into too much detail, this Custom Resource is used to tell the Operator how to configure the Cryostat instance(s) you would like to install within the cluster. Go ahead and create a Cryostat Custom Resource. In this example we have a Project named cryostat1 where the Cryostat instance will be installed, and a Project named apps1 where our workload application is installed.
Using Autoconfiguration
Now that we have a Cryostat instance in our cluster, let’s go ahead and deploy a workload application into that apps1 project. This can be any OpenJDK/HotSpot-based JVM application, since those support Agents and JDK Flight Recorder. In this example we will deploy two applications starting from the Console’s quickstarts, but a wide range of other application types will also work including JBoss EAP/WildFly, Vert.x, Micronaut, Javalin, etc. You can even use non-Java languages that are hosted on the JVM: Kotlin and Scala are prominent examples, even Clojure with the Kit framework has been tested and works just the same, and other languages and frameworks like JRuby/Rails or Jython/Flask should all benefit from the OpenJDK HotSpot technologies used by Cryostat.
We’ll start with two of the basic examples recommended by the OpenShift Console in the Developer perspective.

Let’s begin with the Quarkus example by clicking on “Basic Quarkus”. After leaving the creation form completely default and clicking “Create” at the bottom, we have a build running and a Deployment which will run our application when it’s ready. Repeat the same for the “Basic Spring Boot,” again taking all of the defaults. The next step is the simple heart of the Cryostat Agent Autoconfiguration feature: we will add two labels to the Deployment’s container template. This step is the same for both example applications, so pick one and then repeat it for the other.
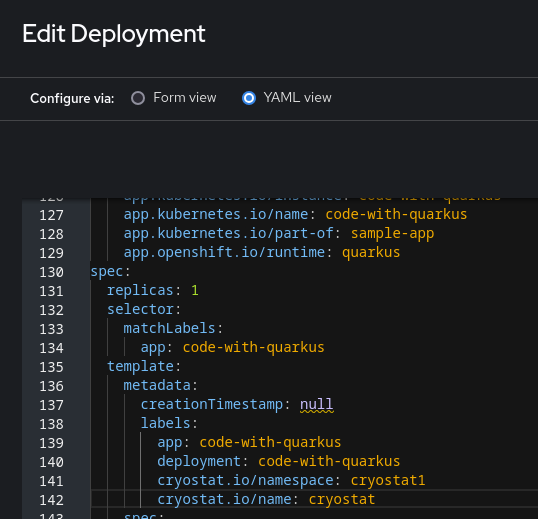
That’s it: simply add the cryostat.io/namespace: <cr_namespace> and cryostat.io/name: <cr_name> labels to your Deployment’s .spec.template.metadata.labels, adjusting them so that these labels match the actual Cryostat Custom Resource you created. The namespace label should correspond to the Custom Resource’s installation namespace, and the name label should correspond to the Custom Resource’s name. Note that this will only work if your application’s namespace (Project) is one of the Cryostat Target Namespaces, or else the Operator will reject the autoconfiguration attempt since the admin who created the Cryostat instance did not authorize applications in this namespace to access it.
After saving these YAML changes, OpenShift will redeploy the application. The Cryostat Operator will see these two new labels on the Pod(s) belonging to the Deployment and patch the application to include volumes for the Cryostat Agent JAR and TLS client certificates, as well as adding environment variables to configure various aspects of the Agent and to wire it up to communicate with your specific Cryostat instance. That’s it - your application should now be registered with your Cryostat instance and ready for all of your monitoring and observability needs.
Let’s try another slightly more advanced example which requires one additional label. Create an application Deployment which deploys the quay.io/wildfly/wildfly:latest container, then add the same two labels. WildFly (and JBoss EAP) has a sophisticated module system for encapsulation and isolation of applications within the application server, so loading the Cryostat Agent in the typical way does not usually work as expected. Fortunately, WildFly 23+ has a feature we can hook into here, which is the MODULE_OPTS environment variable, allowing the Cryostat Agent to be correctly loaded into the module system. Add one more label cryostat.io/java-options-var: MODULE_OPTS, to your Deployment and you should now see that the WildFly application is also set up with the Cryostat Agent.
Advanced Features
The Cryostat Agent has another interesting feature that becomes more accessible thanks to the Autoconfiguration: the Harvester. This is a system within the Agent which allows you to configure the Agent to periodically push JDK Flight Recorder data to the Cryostat instance, as well as push data when the Agent’s host JVM is signalled to exit.
Enabling the Harvester to capture the on-exit data can also be done very simply using more labels: cryostat.io/harvester-template: default alone will do the job. default here represents the “default”/”Continuous” event template, which you may find in your application container at a path like /usr/lib/jvm/java-17-openjdk/lib/jfr/default.jfc. Try adding this label, then scaling down your Deployment after the update rollout completes. You should see a Flight Recording file pushed to your Cryostat instance’s archives containing data from the last moments of your application’s run. If your application is very busy the file may be large, or if the network connection between your application and Cryostat is slow then the file may take a long time to push (and may time out). You can use the labels cryostat.io/harvester-max-age<: <duration> and cryostat.io/harvester-max-size: <size> to tune the amount of data that is pushed on exit. These use standard Kubernetes duration and size values, so try for example a duration of 5m and a size of 20Mi for “five minutes” and “twenty mebibytes”.
To enable the Harvester’s periodic push functionality we will need to add environment variables to the application Deployment. These environment variables will be merged with the ones set by the Operator during autoconfiguration. The Operator will refuse to override any environment variables you have already set, so be sure not to create conflicts in your configuration this way. Try setting CRYOSTAT_AGENT_HARVESTER_PERIOD_MS=30000 and CRYOSTAT_AGENT_HARVESTER_MAX_FILES=5 to instruct the Harvester to push a file every 30 seconds (30000 milliseconds) and to keep up to 5 archived files before rolling over the data. Any other Cryostat Agent configuration properties can be set in the same manner.
Conclusion
With just a few simple labels applied to your Deployments it is now easier than ever to hook up your applications for monitoring and observability using Cryostat. For more information about what kind of information you can obtain and analyses you can perform using Cryostat, check out its Red Hat Product Page or the upstream documentation website.
